Saturday 30 May 2015

Maximum Protection against Sweat

Rexona, Degree, Sure... Whichever you call it!

We can all be Sweaty Bettys this time of the year… actually all times of the year... if it’s not from the heat, it’s from wearing layers and layers of clothing during the winter to keep warm! 
And the inevitable sweat issue and the pong that comes later in the day can be an issue.

I’m all for au naturalle and if you wanna do that! More Power to You! 

So a friend of mine found the miracle and I’m here to pass it on...

Sure Maximum Protection  antiperspirant... it is the miracle you need in your life!!


It promises “maximum strength wetness protection” and “continuous odour protection” and I’ll tell you what, they weren’t lying – You’d swear I was being paid, but I fork out the E7.50 and when I can get it on offer stockpile this for the whole year!!

My armpits stay dry no matter how many layers I wear! And to be honest it lasts me 2 days if I don’t shower in between, but in truth even if I do shower and forget to use it, 
I feel like it still has residual effect! I can’t rave enough about this product.

It also is expert endorsed (who’s the expert? LOL) but it is dermatologically tested which is a bonus.

It comes in a few fragrances which I’ve tried all and they are all on even kilter, it lasts me maybe six-ten weeks... I never really measured the time. And this month’s one is Sensitive Dry... they all have normal deodorant smells, but again you’re not gonna sweat so the smell really means nothing!

The fragrances to choose from are:
  • Sensitive dry
  • Clean scent
  • Confidence


I recently (May 15) bought it in Dunnes Stores for E3.50 - getting a bargain is my dealio! :P

I give this deodorant 5/5

Thanks for reading, if you like this maybe you’d like some of my other posts 


Maybe you'd like to joing me on Face Book?


Wednesday 27 May 2015

"Ease" my "Frizzy" Hair..


 I’ve dyed my hair every colour under the sun from the age of fourteen, usually I dye it dark and decide shortly after I want it light again so I have to bleach it, and no matter was a stylist says, your hair will be damaged and so you have to go through the process of getting it back into good condition!
I can honestly say I’m lazy in the department. 
I just buy what’s on offer and hope for the best! But one range I always go back to for their serums is John Frieda's Frizz Ease… without a doubt I notice a difference in my hair quickly after beginning to use it again... Why do we stop using what we know works??
So this is the serum I purchased this time...


There are so many choices within the brand, but I chose the "Original" one because I could put it in my wet hair and it fights the frizz before the hairdryer gets to it. 
Its a clear gel the smooths into the hair easily and isn't sticky which is always nice!


Testing it Out
The first day I used it I used two pumps throughout my hair, the next day my hair was a little greasy but not terrible but I did notice an immediate improvement in my hair.

The second time I washed it I used one pump and throughout my hair again, the next day again my hair was a little slick, so

The third time I used it I used one pump and just on the lengths of my hair and a little bit further up on the fronts as they get most of the heat with the hairdryer and straighteners.

And Bingo, my hair stays much “cleaner” looking for longer. 

I always test how my hair is with the serums like that as some can turn your hair into a grease-ball and others not so much. 

With this serum I felt I could definitely do one pump throughout the hair for a night out if I was to put a lot of heat on it, otherwise just one put in wet hair at the ends and the front and I really have noticed a great difference in blow drying and over appearance in a short period of time. 

The tube looks like it will last me until autumn but I will continue to repurchase a serum within the Frizz Ease brand. 

Did you enjoy my review? Maybe you might like to read some more? 

Come follow me on Instagram @jennuinelyinteresed and twitter @J3NMD 


Monday 25 May 2015

I Nose my Pore Strips!

Blackheads… Why do they seem to congregate around the nose area? Why??!!

I find now that I’m wearing tan more frequently and I use it on my face, I’ve more issues around blackheads and blocked pores, but not necessarily spots. 
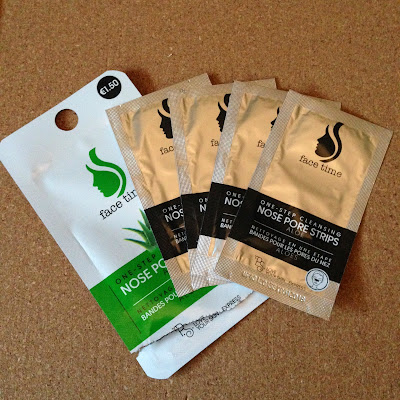
I was doing my usual wander around the cosmetic area in Penneys/Primark and saw these…


 And for E1.50 for four strips in individual sachets I though why not, I wouldn’t be bothered with the Biore as I’ve heard mixed reviews.

So brought them home, gave them their photo shoot, then cleansed the face, followed the instructions, 
I do like leaving it on ages while I watch some YouTube, then slowly peel it off like set concrete.. 
I’m sure a lot of women love that feeling.  
And I’m glad to report they work really well, plenty of gick (ew) was on them! 


And my nose felt so smooth for days after so I will repurchase them again.
What else can I say but I do feel like they need a mention as they are cheap and add a little extra to a pampering evening! 


I also use a proper extraction tool after a hot shower on my face, but it’s far too painful on the nose area, but it's great for the softer, pudgier areas like the cheeks and chin, I follow the procedures then with a witch hazel toner from the Boots brand which helps close the pores again and I feel sterilises my face to prevent a breakout!

If you liked this why not check out some of my other posts!?

Sure Maximum Protection Antiperspirant

Frizz Ease Serum

Why not join me on Facebook?
Click Here to Join me on Facebook

Thank you 

Wednesday 20 May 2015

Lemon Drizzle fo' Shizzle


The last slice of Tangy Lemon Cake

I’ve gone baking mad the last two weeks, It might be because I’m finally free from college and I can actually do things I want without the guilt... although I did bake when I still had one exam to go, so maybe it was exam escape!! Ha Ha

So usually I like to try new things and experiment, but the last two cakes I’ve baked were just easy, quick and tasty!! 
The basic cakes... the first I made and with a little video was a lemon drizzle cake for my mam's birthday! 
Easy and delish and one of my favourites to do.

The recipes was taken from one of my favourite and reliable sites, Odlums.ie

The Ingredients I used for a 8/9inch tin are:
  • Ø  225g/8oz Odlums Self Raising Flour
  • Ø  225g/8oz Butter (at room temperature)
  • Ø  225g/8oz Caster Sugar
  • Ø  4 Eggs (beaten)
  • Ø  Finely grated Rind of 1 Lemon


Drizzle for Topping
  • Ø  Juice of 1 Lemon
  • Ø  75g/3oz Caster Sugar


Oven at 180C you can watch my little video for the method J


But just in case you want to see it written down

Preheat oven to 180°C/350°F/Gas 4.
Grease and base line a 8″/20cms deep cake tin or spring form tin. (I used a 9inch silicone tin, and used some oil to coat the bottom to be safe!)
Beat together the butter and sugar until pale and creamy, then gradually add the eggs, slowly mixing through.
Add the flour and the lemon rind. Mix well to combine. – I always use a spatula at this point!!
Pour the lemony goodness into the tin and level the top
Bake for 45 – 50 minutes approx. until well risen and golden brown. Cake is baked if top is gently pressed and it springs back!

For the Drizzle-
Mix together the lemon juice and the sugar.
Prick top of warm cake with skewer or uncooked spaghetti (smaller holes), then, with a table spoon pour over the drizzle – the juice will sink into cake and the sugar will form a lovely crisp topping. (yum)
Before

After

Glaze Ingredients


The result of the cake was it was savaged by my family within 24hours! It was moist and tangy and so so lemony... the syrup really does add to the spongey-ness of the cake

Marks outta ten... 8/10! I dropped one mark because it’s not chocolate, and another because there are too many cakes out there!!

If you enjoyed this recipe and the pictures maybe you might like to check out my post when I made a fab banana bread with chocolate chips! :) click here 


Wednesday 6 May 2015

To DYE for..my Eye Brows

So I have a post coming about the products I use for my brows, but tonight I decided to dye them
 and so I’m taking you on my journey… well I have done them before!

I’m using the Swiss O-PAR brand that I found in a chemist for half price one day, it can be used for both eye lashes and brows, but frankly I would be terrified to dye my own lashes, the fear of dying my eyeball is real.
Some pictures of the packaging, whats inside and the bits I needed.


I don’t tend to touch my eye brows with a tweezers, I just can’t be bothered, and for E7 I can get them threaded elsewhere (I will discuss that in the other post)

I just find dying them simple and quite gratifying to see that there is some shape… although wonky, to my brows!

The Procedure of darkening!!
 i. Dip cue-tip into bottle “1” and cover the eyebrow completely until drenched. 
ii. Put the timer on for approximately six-eight minutes, wait… 
iii. Make sure your wipe away excess product around the brow, as it does dye the skin 
iv. With the other side of the cue-tip smear the gel from tube “2” over the brow and freak out because its black… but it’s not!! 
v. Immediately wipe away all excess with a wet wipe and voila!!! 
 That easy!!

And I recommend it to anyone really, saves me a fortune and I find when I use it I don’t need to fill in my brows for my day to day look.

BEFORE

DURING WITH THE PRODUCT ON

AFTER

CLOSE-UP,BEFORE

CLOSE-UP,AFTER


I clearly need a little trip to have my brows re-threaded but I’m happy with the colour!
I’ve seen many people re-dying the brows again for more effect, but I ain’t got time for that!!

This works well for day to day in college and pottering around, otherwise I do still use a product in my brows… you will have to stay tunes to see that post!

Thanks for reading my snippet, why not take a gander at my other pieces of writing!

Thanks :)

Friday 1 May 2015

Harry Potter Studios...Broomin' Magical!!


                                                                Harry Potter Studios,Warner Bros. Studio Tour London

In early April 2015, myself and my good friend Marianna travelled to Watford to visit the Harry Potter Studio.

It was an amazing experience, one that I would recommend to anyone whether you’re a fan or not, the sheer talent of the people who worked on the movies is amazing. I am a Harry Potter movie fan let’s say… not a hard core fan… I wouldn’t be winning any prizes at a table quiz unlike Marianna, a total buff!! 

So the details I suppose comes first, we flew into Luton Airport, we got the “A” bus £2.10, to a central bus centre and got the 321 bus (£5 each way), from there to Watford Bus Station
The bus had WIFI and plug sockets, so the hour and a half journey wasn’t as bad, - it was a normal single deck bus, not a coach.

In Watford we stayed in Jurys Inn, clean, quiet and a good price and location for us, we shared a twin room at 45euro each, no breakfast, we booked with booking.com.

There really isn’t too much in Watford, but there is a Nandos!! J and a huge shopping centre that we spent the following day in – Superdrug, Eddie Rockets, John Lewis, Boots, Wilko, and many more!

NOW ONTO THE STUDIO!!!

   At Watford bus station you are picked up by a double decker Harry Potter Bus... 
YES!! A BUS COVERED IN HARRY POTTERNESS!! 
It was £2 return and took about ten minutes to get to the studio! We paid E60 each for the studio, this included entry, the audio guide cassettes and a momento book to take home.

It is advised to arrive early, so we sat for a while and had a drink, they has a Starbucks, and collected our audio cassettes, while waiting to enter we met some employees of the studio, they were so knowledgeable about the films that I stood in awe and listened to them talking to school kids in front of us.

Where to draw the line of what I want to talk about as the fact that I expected nothing meant I enjoyed it even more, then if I had read everything before visiting, so I will say, it is self-guided and they say it’s about three hours to visit the two studios, in-between each there is a “back lot” of outside sets, and props.
And yes we took just under three hours to really enjoy everything.

We also had butter beer, it was delicious!! We both thoroughly enjoyed having it even though the picture suggests different!


  We were fortunate enough to arrive just after the new Hogwarts Express Train was added to the studio, we were able to experience being on platform 9 ¾ which was fantastic.

Throughout the studio we were able to see the layouts of many sets, see the costumes that were worn, props that were used as well as seeing in detail how the technical aspects of the movies were implemented to give the “real” affect! Just wondrous!!


In the middle of the first studio, there is a magical corner filled with green screens and here you can make little videos of yourself on a broom, or in the car Ron came to rescue Harry in, so funny to watch others doing it until you realise you have to “put on a show” yourself! 
I bought two pictures of myself! It was actually good value for the two of us to buy four as we basically got buy one get one free! J I’m not brave enough to put those pictures up!

The shop at the end was just amazing, the variety of gifts and memorabilia was epic, but so were the prices especially with the exchange rate for us. Your talking 13-14 euro for the solid chocolate frog or the jelly beans of every flavour,  I couldn’t bring myself to spend that. 
But we spent ages browsing everything from cloaks, hats, wands and actual full scale brooms! Magical!!

Overall I wouldn’t even second guess myself recommending the studios to anyone who had any interest at all in Harry Potter, I felt it wasn’t an expensive trip, everything was convenient in term of transport and staying in Watford. If staying in London there is a bus that travels from London Victoria.
A note about the choices for tickets, one does not need the audio guide, I used it for 3 exhibitions, it only offers extra information, there is plenty going on around you, and I was totally distracted and not bothered after a very short while to stop and listen. As for the momento book, to be honest, I haven’t really looked at it after I came home. I would say get the cheapest ticket and save your money for the green screen pictures and buy yourself a wand!
 ALSO- if you have a selfie stick bring that for some good pictures, as many of the exhibits are huge and arms reach isn't long enough! 

A lil collage of our trip ..